Atom.io editor now runs on Windows

Get the shiny new Atom text editor built by the guys at Github . A fully featured editor built from the ground up using web technologies , much like Brackets , but much more powerful than it. And I hate to say it but it's even much better and friendlier than the Sublime Text IDE .

Here are a list of features offered by Atom

  • File system browser
  • Fuzzy finder for quickly opening files
  • Fast project-wide search and replace
  • Multiple cursors and selections
  • Multiple panes
  • Snippets
  • Code folding
  • A clean preferences UI
  • Import TextMate grammars and themes
A bit from their site
Node.js support makes it trivial to access the file system, spawn subprocesses, and even start servers directly from within your editor. Need a library? Choose from over 50 thousand in Node's package repository. Need to call into C or C++? That's possible, too.

Officaially it's available only for Mac OS , thnaks to Someguy123 it is now also available for Windows . And works perfectly on Windows 7 and 8.


Exploiting iTunes Store App Purchase flow

The virtual credit cards are in heavy use these days , where the first time credit card users rank up high in majority who are reluctant to use it due to data theft . Well I was also one of them and first started using it with the hdfc bank . Which led on to the following exploit .
This vulnerabilty is due to the use of virtual credit cards , which Apple might not have considered much while documenting its's software .

For the dummies out there :


Virtual credit cards are short term credit cards that last for about 24 hours online , and after the time period the CC numbers become useless . Being much secure most of the banks worlwide provide this facility .


Now for exploiting this vulnerability  , you'll be needing a dummy Apple ID ( not your regular apple id ) , a virtual credit card ( having the least possible amount in it ~ $1 ).

According to iTunes App purchase flow , it does not debit money from your account unless , the application , movie or song has been downloaded completely .

Preparing 

Keep your dummy account and virtual credit card ready also note that after this hack you'll not be able to use this dummy account again , so again better not use your original account .
Sign in the itunes store with this dummy account.

Exploiting

For downloading multiple apps limit your download speed to the minimum , I suggest you keep it at about 50 kbps . After this , purchase your first application , now as it is paid it'll surely ask for your credit card unless you haven't entered it earlier .
Enter your credit card details , and shortly your download will begin .
Now as soon as it begins , pause your download and purchase another app , after it starts downloading pause it ( Don't worry you won't loose it ).
You can do this for all the other applications that you'd like to download .
Once your wishlist is complete , set your internet download speed to the maximum and start downloading all the apps one by one .
 ** Note this down , start the next download just before the former download completes ( This is an important step )**

So , now you officially have hundereds of paid iOS applications ( It does depend on your download speed) . If you are carrying out this process on a desktop , all your apps are saved onto your desktop . And if on an iPhone , be sure to sync it to your desktop in order to save your downloads .

After your dowloads completes , iTunes will display a message saying there is something wrong with your credit card . Just ignore it and sign off your apple id . And the next time you log in with this dummy apple it , you won't be able to use it . You'll keep on getting an error for your faulty credit card .

Ilustration by suka-strife.tumblr.com


What Apple can do to fix it

  • Allow downloading only a couple of paid apps at a time.
  • First check the credit limit of the credit card before serving ( This method at this time is highly complex) .
  • If connected to internet , check the viability of the applications installed .
This exploit seems to work on all virtual Stores ( not Amazon ) , that follow this App purchase flow . I think it might work on Google Play stores , I haven't tested it yet .

    Sublime Text 3 Build 3059 Crack


    Sublime Text is a light weight integrated development environment , but hefty in terms of support  . Though great it comes with a heavy price tag of  $70 . This calls for hacking an' cracking .


    Firstly grab the Sublime Text 3 package from the official website .
    Then follow the below steps as per your operating systems.
    **It doesn't seem to work on OS X 10.9 Marvericks** 

    The links dosen't seem to work due to dropr linitations  , here' s another link that will work 


    Mac OS X


    Download the file : http://d.pr/f/QE3d
    Rename the above file to Sublime Text
    And replace it with the original file .
    As tipped by our reader , for those running OS X Marvericks , you'll need to make it an executable file: chmod u+x Sublime\ Text


    Windows x64

    Download the file : http://d.pr/f/60RQ
    Rename the above file to sublime_text.exe
    And replace it with the original file

    Windows x86

    Download the file : http://d.pr/f/1HIj
    Rename the above file to sublime_text.exe
    And replace it with the original file

    After completing the above steps , launch the replaced file and in the help menu select Enter License , and fill in the below license.  

    ---BEGIN LICENSE---
    Love Science
    Unlimited User License
    EA7E-18848
    ........................
    .._____.................
    .|  __ \      | |       
    .| |  | | __ _| |_ __ _ 
    .| |  | |/ _` | __/ _` |
    .| |__| | (_| | || (_| |
    .|_____/ \__,_|\__\__,_|
    ........................
    ---END LICENSE---

    That's it , you now have unlimited user license for Sublime Text 3 .

    Using Recess - CSS Hinter on Windows

    Perhaps the best CSS hinter I've ever used , in reality it's the only one I have ever used . It open sourced a few years back and hardly ever got noticed .
    A hinter basically is a piece of code that formats the ugly looking code keeping it tidy and consistent .
    This post outlines the process of using Recess on a windows set up .
    NOTE : You'll need to have Node.js installed.

    After installing Node.js , search for cmd . And select the one which says Node.js command prompt . Get it?


    Now recess is stored in a web Node Package archive known as the Node Package manager .
    And the syntax for installing Node packages is
    
    npm install -g [ package name ] 
    So for installing recess we'll type
    
    npm install -g recess

    You'll see the comand prompt buzzing with a dozed of  http get requests , so if you have a slow internet connection sit back and relax .


    After installing RECESS there are a couple of things that you can do with it , major ones being compiling
    it,checking for errors , style sheet flow etc.

    Using RECESS

    NOTE: All this is done within the Node.js command prompt

    The general syntax is
    
     recess [ path ] --[options]

    You can specify the following options

    •  noIDs - Don’t style IDs like #foo
    •  noJSPrefix - Don’t style .js- prefixed classnames
    •  noOverqualifying - Don’t overqualify your selectors, like div#foo.bar
    •  noUnderscores - Don’t use underscores when naming classes, like .my_class
    •  noUniversalSelectors - Don’t use the universal selector, *
    •  zeroUnits - Don’t add the unit to a value of 0, like 0px
    •  strictPropertyOrder - Enforce a strict property order (order defined here)
    •  help - provides a quick cli cheatsheet
    •  compile - outputs your compiled source
    •  includePath - additional directory to look in for relative LESS imports (repeat for each additional directory)
    •  compress - outputs your compiled source, but minified
    •  watch - watch a directory and automatically compile a file when changes occur
    Feel free to flood the comments section.

    Coding Subtle Navigation Bar With CSS3

    Throwing in some of the fancy new CSS 3 selectors could transform the plain old unordered list into a real web menu . Jump the jump for the code ( psst. It does look awesome )

    Starting with the Html markup :


    Now heading on to the CSS.

        nav{
           padding:20px;
           margin-top:20px;
           font-family:'HelveticaNeue';
           float:right;
        }
        nav ul{
        }
        nav li{
           display:inline-block;
        }
        nav a{
           float:left;
           color:#fff;
           text-decoration: none;
           text-shadow: 0px 1px 0px #908c8c;
           padding:5px 10px;
           transition: all 0.2s ease-in-out;
        }
        nav a:hover , nav a:focus{
           color:#fff;
           opacity: 0.75 ;
           text-shadow:0 1px 0 #ff3737,0 2px 0 #fc2dd4,0 3px 0 #9b37ff,0 4px 0 #37c9ff,0 5px 0 #1ab78f,0 5px 0 #1eeb47,0 6px 0       #9ce812, 0 6px 1px #6d6d6d ; 
        }

    Notice the text-shadow property , this is where all the magic happens . What we are implementing here are solid multiple layers of text using the text-shadow property to give it a three dimensional effect .
    I have written the text-shadow property all together , for making it short and sweet , but it can also be written in this way .
    The text-shadow mainly three parts  , the x-y-z coordinates , and then the color of the shadow.

    
          text-shadow:0 1px 0 #ff3737 ;
          text-shadow:0 2px 0 #fc2dd4 ;
          text-shadow:0 3px 0 #9b37ff ;
          text-shadow:0 4px 0 #37c9ff ;
          text-shadow:0 5px 0 #1ab78f ;
          text-shadow:0 5px 0 #1eeb47 ;
          text-shadow:0 6px 0 #9ce812 ;
          text-shadow:0 6px 1px #6d6d6d ;

    The final result would sum up to this , although it would be much better if you'd use HelveticaNeue instead of Arial Rounded .

    Recreating & Playground


    If you have already come across Dribbble , you certainly have noticed the hover effect on the popular shots . The image blanks out , and all you can see are the comments put up by the dribbblers along with the post title and the date. Quite subtle , so we decided to recreate this effect .
    The idea is to set the text matter's opacity to 0 and on hover to 1 .But it takes much more than this to get this perfect effect . Clever element posistioning , and a little bit of math ( tiny little bit ) .


    THE MARKUP

    
    <div class="blah">
    
                <img alt="Main" src="http://cl.ly/VvpM/ren.jpg" />
    
                <aside>
    
                <h1><strong>Dribbble Shot</strong></h1>
    
                <p>The quick, brown fox jumps over a lazy dog. DJs flock by when MTV ax quiz prog. Junk MTV quiz graced by fox whelps.</p>
    
                    <h7>Monovalent</h7>
    
                </aside>
    
            </div>
    
    We've wrapped the whole text- content inside an aside tag , as we'll need to change the opacity of the content only , hence an extra wrapper.

    CSS

    
    .blah{
    
        display: :block;
    
        margin:0 auto;
    
        margin-left:150px;
    
        margin-top:100px;
    
        float:left;
    
        max-width:500px;
    
        border: 9px solid #fafafa;
    
        height:350px;
    
        background-color:#fafafa;
    
        border-radius:5px;
    
        box-shadow: 0 1px 0.5px #b1b1b1;
    
    }
    
    aside{
    
        vertical-align: baseline;
    
        position:absolute;
    
        opacity:0;
    
        margin:0 ;
    
        padding:10px;
    
        z-index:3;
    
        max-width:100%;
    
        width: 380px;
    
        height: 280px;
    
        float:left; 
    
        transition: all 0.2s ease-in-out;
    
    }
    
    aside:hover{
    
        transform:all 0.2s ease-in-out;
    
    opacity: 1;
    
        background-color: #fafafa;
    
    }
    
    h7,p,strong{
    
    background-color:transparent;
    
        margin: 40px;
    
        margin-top:50px;
    
    }
    
    h1{
    
        background-color:transparent;
    
        font-family:'HelveticaNeue';
    
        font-weight: 1000;
    
        color:#363636;
    
    }
    
    h7{
    
        position:relative;
    
        color:#969696;
    
    }
    
    p{
    
    color:#313131;
    
    }
    
    img{
    
        float:left;
    
        transition: all 0.2s ease-in-out;
    
    }
    
    img:hover{   
    
    opacity:0.2;
    
    }

    Illustration by Artcore

    Now since the image content has to lie on top of the image , we add a positive z-index to it , and not negative or I guess we could also use the :after property to achieve this.

    A bit about position:absolute 

    This is a very powerful type of positioning that allows you to literally place any page element exactly where you want it. You use the positioning attributes top, left bottom and right to set the location. Remember that these values will be relative to the next parent element with relative (or absolute) positioning. If there is no such parent, it will default all the way back up to the <html> element itself meaning it will be placed relatively to the page itself.The trade-off, and most important thing to remember, about absolute positioning is that these elements are removed from the flow of elements on the page. An element with this type of positioning is not affected by other elements and it doesn't affect other elements. This is a serious thing to consider every time you use absolute positioning. It's overuse or improper use can limit the flexibility of your site.

    Take a look at the final demo

    Font Blend : Abril Fatface Georgia with Proxima Nova

    Google Font combinations , Abril Fatface , ProximaNova , Georgia , download proxima Nova

    I started developing a taste for great font blends a month after starting developing for web , and now I simply can not resist them . So every week I'll be experimenting with a lot of font faces and blend them well enough to make a glass full of creamy strawberry shake , yummy .
    Hence the name Font Blends. One more thing all the fonts used , will be available for download in some kind or other .

    Starting with the heading font , it's the most dominant font faces I've used ( well among the free ones ) .

    Google Font combinations , Abril Fatface , ProximaNova , Georgia , download proxima Nova

    Abril fatface is a free font available openly on Google Fonts developed by TypeTogether , and can be used on the desktop via SkyFonts by Monotype .

    Google Font combinations , Abril Fatface , ProximaNova , Georgia , download proxima Nova

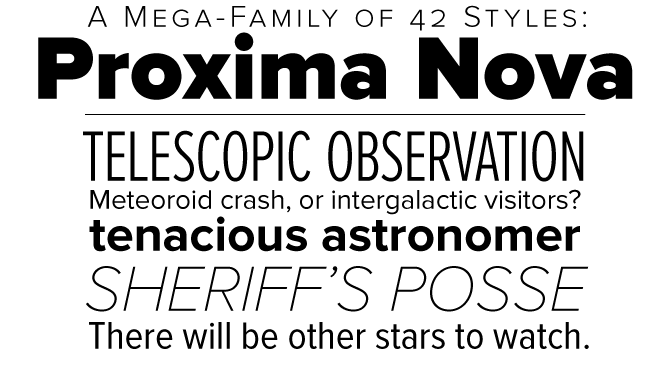
    Proxima Nova is a premium font , download here.

    A few bonus shots I tried

    Google Font combinations , Abril Fatface , ProximaNova , Georgia , download proxima Nova

    Google Font combinations , Abril Fatface , ProximaNova , Georgia , download proxima Nova

    Google Font combinations , Abril Fatface , ProximaNova , Georgia , download proxima Nova